
Connecting BLE Bluetooth 4.0 to iOS device
Introduction
Nowadays startups become more and more popular. Exploring Kickstarter.com or Indiegogo.com, we can notice how lot of people want to bring their ideas to life. There is a trend of creating gadgets and devices that work with iOS devices. Usually, most of devices exchange data with ios via bluetooth. Working with MFI license is time consuming at the early stage of the project, and if you need to make a quick prototype not very effective time and effort wise. Now there is a solution to to make data exchange with iOS without MFI license. After iOS started to support BLE (bluetooth low energy) thing became easier for developers and engineers. Now there is a way to work without MFI license without your prototypes.
BLE Bluetooth 4.0 HM-10
Let’s take a look at HM-10 module. Devices from BLE Bluetooth 4.0 family, consume very little energy: In sleep mode 400uA~1.5mA, Active mode 8.5mA. In sleep mode module stays visible and we can connect to it. Changing advertising interval of the bluetooth influences greatly the work time from the battery. Interval varies from 100ms to 1200ms and more. Lot of parameters can be tuned and their limits depend on model. Also we should mention some deficiencies of this module. The thing is that data transfer speed is limited, so this BLE can meet up standards of low energy consumption. As for iOS, this module was limited to speed around 2kB/Sec. For most of projects this speed is good enough. But there are projects that require more speed, that’s why data transfer speed should be determined at the early stage of the project, because in some rare cases BLE is not an option and the only way to make device work will be using classic bluetooth 2.0 with MFI license.
Parts
In order to connect your custom device to iOS without MFI license we need these parts:
- BLE module HM-10
Documentation: link

This module is interesting because it needs 5V, the same voltage one that Arduino uses. Also on this module we have UART converter, that converts UART from 5V to 3.3V. There is no need to tune anything in this module, everything is tuned already. Standard settings include:
- Visibility in turned in state
- HMSoft – name of module
- No authorisation needed
So all you need is simple connect this module to Arduino and it’s ready for work.
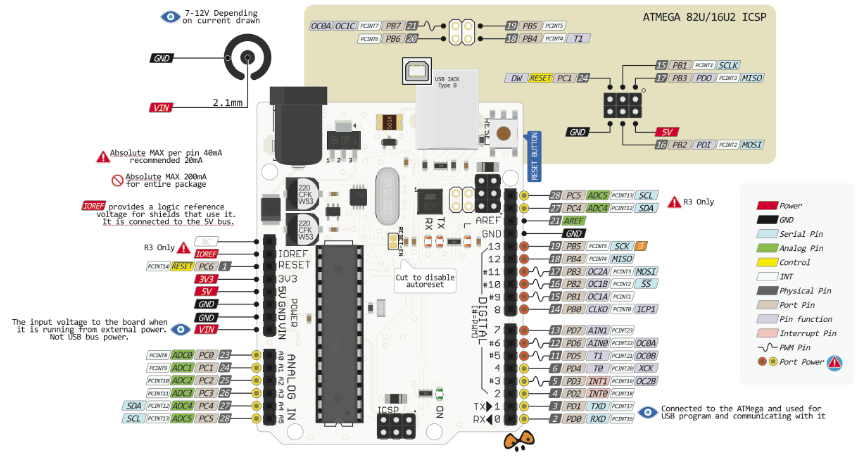
2. Arduino UNO R3 is very popular platform for doing HW prototypes.

3. iOS device. These devices support Bluetooth 4.0 BLE:
- iPhone – starting from iPhone 4S
- iPad – starting from The new iPad
- iPad mini and next version of it
Connection between HM-10 and Arduino UNO R3

- HM-10 VCC is connected with Arduino 5V
- HM-10 GND is connected with Arduino GND
- HM-10 RXD is connected with Arduino Pin 3 (SoftWareSerial TX)
- HM-10 TXD is connected with Arduino Pin 2 (SoftWareSerial RX)
Procedures
Software we need
- Arduino IDE 1.6.3 – You can use any other version, but on this one everything works for sure: link
- xCode – framework to develop for iOS and Mac OS X download
Sketch for Arduino
//BLE_BLINK

#include <SoftwareSerial.h>

SoftwareSerial BLE(2,3); // RX, TX

void setup() {
   BLE.begin(9600);
   pinMode(13, OUTPUT);
}

void loop() {
    while (BLE.available()){
         if(BLE.read() == 'B'){
               digitalWrite(13,HIGH);
               delay(150);
               digitalWrite(13,LOW);
         }
    }
}
As we see from code, when we receive ‘B’ symbol via Serial Port, we will turn pin 13 to HIGH state for 150 msec. As in Arduino UNO R3 a led light is connected to pin 13 parallely we will see a blinking of led light.
iOS Project
For developing test project we can use example producers of this module provided on jnhuamao.cn. As example xCode project was done on Obj-C (SerialGATT) we should wrap it in our wrapper BLEWrapper.swift, done on Swift. We will use Coding Blocks here. Object is created as instance, but this won’t bother us to create classes, if we need more objects. General functions of this wrapper: Let’s take a look at main functions of my wrapper.
//function for callback.
//connectBlock - block that will receive connection status (connected or disconnected)
//receiveBlock - will receive data from HM-10
//deviceFoundBlock - this block will be called if in search result device that we can connect to will be found.
//updateRSSI - receives signal strength indication

func connectBlock(connect: ((ObjCBool)->Void),
    receiveBlock receive: ((NSString,NSData)->Void),
         deviceFoundBlock found: ((CBPeripheral)->Void),
              updateRSSI rssi: ((Int)->Void))

//connection to found device by ray index
func scanHMSoftDevices()

//devices index starts from 0, in same order they were received by deviceFoundBlock
//in a result of successful connection, connection status will be changed in connectBlock
func connectToIndex(index: Int)

//send bytes to connected HM-10
func sendMessageWithData(data: NSData)

//send data as string
func sendMessageWithString(string: String)

//disconnect from module
func disconnect()Conclusion
As we have learned from this article doing your custom device with BLE is not so difficult. Now there is a way not to use MFI license for connecting custom HW device to iOS. You can connect many different modules and sensors to Arduino, and send that data to your iOS device. Also you can manage various modules connected to Arduino. As for Arduino there are lots of code examples and tutorials. As for sizing issues there is ability to use Arduino Pro Mini for small devices. So the last thing you need is a good idea for you future device!
